Like all tools, shovels age and eventually break after years of heavy wear and tear.
We will teach you how to repair that shovel and bring it back to mint condition.
Sometimes, it’s easier to buy a new one; however, shovel repair is easy, saves the planet, and the rewarding feeling of repurposing the tool will leave you feeling accomplished.
Table of Contents
What Part Needs To Be Fixed or Repaired?
First, let’s figure out which part of the shovel you need to fix. A shovel has three essential components:
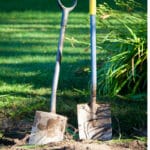
Shaft or Handle or Grip
The shaft is the handle, also called the grip and is the part that usually gets damaged on a shovel. It either accidentally breaks into two or becomes weak from wood rot or wear and tear.
Keeping the shaft components in good working condition is essential.
Check out our article Prepare Your Shovel for Storage for more information on how to keep your shovel in good working condition.
However, if, despite caring for the shaft, it still needs repairing, you can buy replacement shafts.
Socket and Rivet
The blade and shaft are bound together with rivets. These can loosen over time, causing the blade to wiggle or even come off. The socket is the round opening in which the shaft fits.
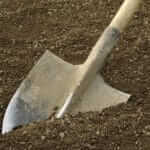
Blade
The blade is the steel part you use to cut through the material—whether it’s soil, snow, cement or the ground.
It is sometimes called the scoop or the head.
The blade can be square, round or tapered, depending on the purpose of the shovel.
Shoulder or Footrest
The shoulder is the square part of the blade located nearest the shaft.
It’s sometimes called the footrest because that’s where you put your foot to add pressure on the shovel whenever you dig it into the ground.
Now that you know what part(s) need repair, here is what you need to do.
Steps to Fix and Repair
A. Fix and Repair The Shaft, Socket and Rivet
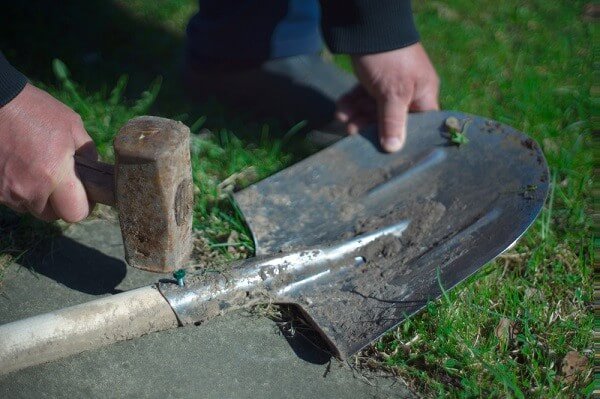
Remove the rivets the connects the blade to the shaft. Generally, utilizing a drill with a drill bit that is the same size as the rivet will release the rivets.
Alternatively, you can clamp the shovel with a vice so it doesn’t wiggle or move. Then cut or grind away the head of the rivet with either a power grinder or a hacksaw. Finally, get a pin punch and place it on the beheaded rivet. Tap it with a hammer until the rivet falls out of the handle and remove the old shaft.
You may find the shaft a challenge to get out. To get a bit of leverage to remove, find a wall, sturdy table, or rail that can provide support while you pull the handle off.
Position the shovel blade on its edge and try to hook the shovel shoulder over the edge so you can get a better grip.
If this doesn’t loosen the shaft, get a hardwood dowel, ideally about half an inch large, and position it at the shaft base. Strike it with a hammer while pulling at the shaft. It may take time, but eventually, you will separate the shaft from the socket.
At this point, your focus will now be on repairing and preparing the socket. It is essential to get rid of all the rust, wood or dirt in the socket.
You want the socket to be as clean as possible when you replace the shaft for a proper fit. Chip, drill, tap, hammer away until it is clean then, tap it a final time and wipe it clean.
Next, insert the new shaft. Push it in as far as possible. If you are using a wooden handle, orient it, so the wood shaft rings face the side. By doing this, you will improve the strength of your shovel.
Once you have it positioned, hammer the handle’s end with a rubber mallet to push it deeper and more firmly into the socket.
Once secure, attach the handle back to the socket by replacing the rivet.
You’ll need a drill, screws and screwdriver.
Drill a 1/8 diameter hole about ¼ inch deep into the shovel handle, insert a 3/16 inch screw through the rivet holes, and tighten it.
Next, drill another hole through the handle so you can secure it with a rivet. The size of the hole depends on the diameter of your rivet. Insert the rivet, and tap it gently with a hammer to get it through the hole.
Make sure about 3/16 of an inch of the rivet protrudes on the opposite side of the hole.
Place the rivet head on a table, workbench or any flat surface. Lastly, all you need to do is lock the rivet by hammering it down to flatten it and make it more secure.
B. Fix and Repair The Blade and Foot Rest
A shovel blade, unless used in strange ways, will only require rustproofing and sharpening.
If you find that the blade or foot is bent, you can utilize a hammer to straighten out the metal. Note that hammering cold metal may cause other bends, cracks and damage and will weaken the metal.
If there are cracks in the metal and you know how to weld, you can repair it. As welding and hammering are beyond this article’s scope, it does not cover how to fix metal or how to weld. However, we can discuss how to improve a chipped, dull or rusty blade edge as this is a common repair.
Look at the edge of your blade. If it is dull, chipped and rusted, it needs repairing. A blunt blade edge is like cutting into a fine steak with a spoon. A task that probably can be achieved but is messy and labour intensive.
The first step in sharpening is to look at how much rust is on the blade. Rust on a metal blade will dull the edge and eat away the metal, which is why the edge of the blade often has chips in it.
To repair the shovel from rust, clean the surface by scraping, utilizing a wire brush or steel wool and wash off any dirt or debris remaining.
Once clean, spray a lubricating oil onto the shovel. The oil will protect the metal from rust. Be aware that this is not a one-time application. To keep the rust at bay, spray a lubrication oil onto the blade after each use. If the shovel is in storage, lubricate once every 3 to 6 months.
Sharpening a blade’s edge is much like sharpening a kitchen knife. If there are chips in the edge, then the edge needs to be filed down to have a straight blade edge.
Utilize a grinder to even off the blade, checking with a spirit level to ensure a straight edge,
Once the edge is straight, then a file or a grinder is needed to create a beveled edge on the blade.
The beveled edge only needs to be on the top side of the shovel’s blade. The top side of a blade is the side that, when digging, holds the dirt, snow or sand.
A beveled edge is an edge that has an angle to it. This edge cuts through the soil, snow, sand, and grass and allows you to lift and move the substrate.
Whether using an electric grinder or a hand file for sharpening, ensure you are grinding or filing at a 45-degree angle to achieve the best sharpness.
If the angle is greater than 45 degrees, then the blade’s tip is more likely to chip, and if the angle is less than 45 degrees, then the blade will not slice and will appear to be dull when using.
To sharpen a blade and create a beveled 45-degree angle, you can use a grinder or utilize what is known as a rasp also called, an 8-inch bastard file to achieve a sharp edge.
When sharpening, lay the shovel down and ensure it is secure. A wandering shovel is not helpful when trying to sharpen the blade.
Once secure, hold the grinder or file at a 45-degree angle.
If using a grinder, run the grinder forward and backward across the edge, not side to side, until the desired sharpness has been achieved.
Utilizing a handheld file to sharpen will give you a better result; however, opinions vary on this. We believe that a file provides a more accurate result across the blade of the edge.
To sharpen the blade with a file:
Run the file across the blade, from the top of the file to the file’s bottom. Ensure you are moving the file forward and away from you across the shovel’s edge.
Lift the file up and off of the blade and bring the file back to you without touching the shovel.
Place the file at a 45-degree angle next to the location you just completed and repeat these steps until you have sharpened the blade’s entire length.
Check the sharpness by trying it out; if it cuts easily into the soil, your good to go. If it doesn’t cut easily, then keep sharpening.
Many sharpen the wrong way. As the file has grooved edges running the file back and forth across the edge will only result in dulling your file and causing frustration.
Once the beveled edge has the sharpness you desire, turn the shovel over. On the backside, you will see and feel it is not smooth. This unevenness is due to burrs from creating your beveled edge.
Removing these burrs is the last step in sharpening the blade. You utilize your file one last time, running the file over the burrs to remove them.
To Reduce Shovel Repairs Select a Durable Shovel
Repairing a shovel is rewarding, and replacing it can be expensive. You want your shovel to work when you are ready.
Investing in a quality shovel from the start is the best way to avoid repairs.
One of the advantages of wood shovels is that it’s easy to replace handles or make minor repairs. Fixing minor wood damage can be done with regular wood glue.
If you’re going to get a wood shovel, make sure the shaft is high-quality hardwood like ash, cherry, beech or hickory. Since wood is prone to rotting in damp conditions, don’t leave your shovel out in the elements.
Metal shovels come in all prices and sizes and are relatively easy to find. It has affordability and convenience, and if you need a simple tool for occasional garden work, you can’t go wrong with a metal shovel.
However, it’s worth the time to look for a high-quality shovel if you’re planning to use it for heavy-duty jobs. The best metal shovels are made of rust-resistant steel and can last for years.
High quality plastic shovels made of solid polypropylene plastic are standard. As plastic shovels are created from a mold, they don’t have weak points that can break. They are resistant to rust, easy to clean, and safe to use with most chemicals.
Since they’re lighter than metal or wood shovels, they may be a better option for people with bad backs. However, most plastic shovels are used to remove snow or sand and are not appropriate for dirt or digging in the garden.
Fiberglass shovels are lightweight and very durable. While expensive, they can last for decades without requiring any replacement. These are the best shovel that you can purchase.
For more information on choosing a shovel read our guide: Choosing The Best Shovel For You